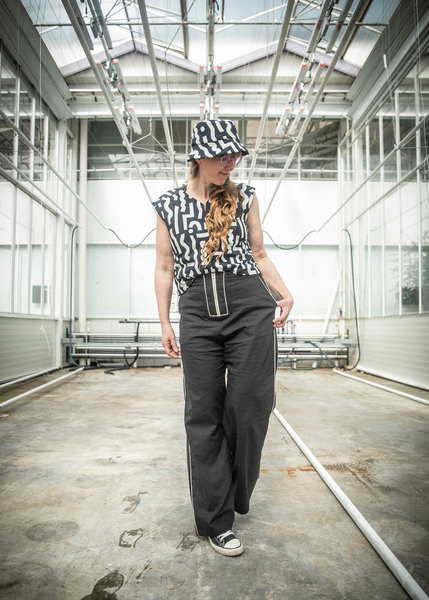
In an attempt to design a "basic with a twist", our newest addition to the Misusu pattern family, the Shift tee was born! Like most designs, it was my personal need for a relaxed fitting raglan style tee with something different, that drove the design process. Well mission accomplished! The most interesting feature of the Shift tee are the "shifted" seams, creating interesting style lines perfect to get creative with! But those seams do present a challenge when you need to make fit adjustments. The Shift tee tutorial does cover some of the most common fit adjustments, but what if you need a significant full bust adjustment (FBA)?
Well, this blogpost is here to help! In this post we'll walk you through creating a custom FBA by creating a bust dart. We'll also cover how to optionally eliminate the bust dart by using the "shifted" side seam.
We'll cover:
You'll need:
The Shift Tee is drafted with a B cup bust. This means the difference between the high bust and bust measurement in the pattern for all sizes is 5cm (2"). If the difference between your high bust and bust measurement, you have to either blend between sizes or perform a full bust adjustment.
To determine if you need to perform a FBA, first measure your high bust. Compare this measurement with the high bust measurements in the size chart. Next, measure your (full) bust. Also compare this measurement with the bust measurements in the size chart. In both cases, choose the size closest to your measurement. When in between sizes, select the size up for a relaxter fit or choose the size down for a more fitted fit.

When the pattern size difference between your high bust and bust measurement is no more than 1 pattern size (see yellow example) we recommend to follow the size blending instructions in the tutorial. If the difference between your high bust and bust measurement is 2 pattern sizes or more (see green example) we recommend to do a custom FBA.
If you’ve come to the conclusion that you need to do a FBA here's how to calculate your FBA amount. By now you've determined which pattern size fits your high bust the best. This size will be the starting point for your FBA.
Now, subtract the bust measurement belonging to the pattern size that fits your high bust best from your personal bust measurement. In case of the green example above, this persons FBA starting point is size HH, based on her high bust measurement. The bust measurement belonging to that pattern size is 114cm. But her personal bust measurement measures 126cm. This is a difference of 126cm - 114cm = 12 cm. With pattern size HH as her starting point, this person needs to add the difference of 12 cm to increase the bust width of the pattern. This means she has to increase each half of the front bodice by 6cm.
For more detailed info on how to determine and calculate your FBA, check out this blogpost.

Step 1 | First we're going to prepare the front bodice so we can locate the apex. Draw the 1cm (3/8") seam allowance and 2,5cm (1") hem allowance back in on both bodices (blue line) and your front left (long or short) sleeve.

Step 2 | Overlap the bodices at the diagonal side seam and tape in place. Draw 2 vertical lines going down from the lowest notches. Cut along those lines. You've now created an assembled front bodice. Set the left & right back bodice aside.
 Step 3 | Now, temporarily tape the left front (long or short) sleeve in place, by matching the seam lines. Draw a vertical line going down from the center notch. This is the center line. Fold along this line.
 Step 1 | Stand in front of a mirror and hold the folded front bodice & sleeve to your body. Make sure to line up the shoulder line of the sleeve with the top of your shoulder and the center line to the center of your body. Locate your apex (other word for nipple) and mark it on the front bodice.

Step 2 | Remove the left front (short or long) sleeve. Transfer the marked apex point to the other side of the bodice.

Step 4 | DRAFT

Step 6 | SPREAD
Now we’re going to add the extra width directly to the green line that went down from our apex point. Start spreading while keeping your main pivot point in place. Spread your lower bodice (yellow) down & to the right. Keep spreading until the width between the 2 green lines is half the FBA amount you need. Make sure to keep the green lines parallel to each other. Tape everything down.
 Step 7 | Finally, cut the center part of the front bodice horizontally in half and side the lower part down to line up with the sides of the front bodice. Tape down.
 By now you've successfully performed an FBA by creating 2 darts. But there are still some steps to take and things to consider. The main question is whether you'd like to remove the darts or keep them. But how does that look and what does that mean for the construction of the Shift tee? Let's talk you through the 3 versions and their pro's and con's.

VERSION 1 - Removing the darts
This option is the best method to remove both darts. Changes to the design: in order to remove both darts, we're going to use the original diagonal seam and add a mirrored second diagonal seam (pink line). After removing the darts, the left & right back bodices can be reconnected to the front bodice.
VERSION 2 - Keeping the darts
This option is the fastest but will eliminate the diagonal side seams. Instead, we'll create a separate back bodice with a "normal" side seam. Also, the darts have to be slightly redrafted.
VERSION 3 - Keeping the left dart and removing the right dart
In terms of aesthetics, this option comes closest to the original design of the Shift Tee. It's a combination of both option 1&2. In this approach, we'll remove the right dart by using the diagonal side seam. The left dart stays in place and is slightly redrafted.
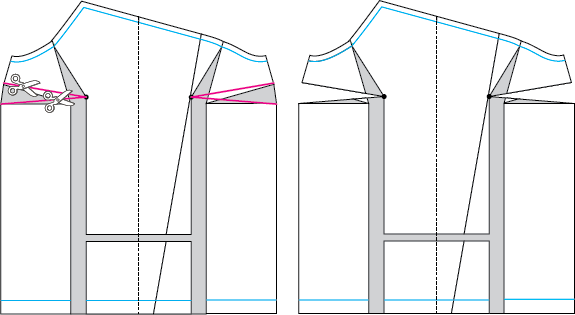 Step 1 | Before you can eliminate the bust darts, you have to redraft it. In this example, the apex point is located on the diagonal line, but the same method applies if your apex point is located next (to either side) of the diagonal seam. Draft two lines from the apex towards the side seam following the dart (created by the FBA) underneath. Cut out the darts along those lines.
 Step 2 | Draw a new diagonal seam paralel to the original one. Mirror it to the other side. In our example, the apex point is placed on the original diagonal side seam. But the same principle applies when your apex point is placed on either side of the original diagonal side seam. You can even adjust how "diagonal" you want your seam to your taste. Just make sure not to cross over the center line. Add 2 notches marking the apex points on the center bodice (green lines).
 Step 3 | Cut along the new diagonal seams. Separate the top part of the dart. Line up the side seam (marked with “+”) and from there, close the dart. Tape together.
 Step 4 | Depending on your personal FBA amount, there will be a (bigger or smaller) difference in length between the legs of the dart, causing the lower part to stick out. Place some paper beneath the upper part, tape together and redraft the seam (pink line). Redraft (straighten) the outer edge of the side bodices from top top bottom (orange line). If needed, redraft and smooth out the upper arm hole curves, influenced by the dart (green lines). Add notches to your side bodices, matching the notches on your center bodice.
Cut along the new seam lines (pink & orange lines).
 Step 5 | Collect your left & right back bodices. Assemble the back bodice by joining the diagonal seams. Tape in place.
 Step 6 | Collect your side bodices. Assemble the side bodices with the back bodice by lining up the outer edges at the top (marked with “+”). Tape together. Redraft the bottom hem (red lines). If you need to add extra width to accommodate your hips, you can add it at this point. Consider that this might not be necessary when you're making the cropped version. Redraft the bottom hem (red line). Side note: double check if this assembled pattern piece fits your fabric width. If not, keep (one of the) side seams and add seam allowances.
 Step 7 | Finally, add seam allowance to all diagonal side seams. You now have a separate front and back bodice. You're ready to sew your Shift tee!
 Step 1 | When keeping the dart in the front bodice, you still need to redraft it, but the method is slightly different from the previous ones. Mark your dart point, 2,5 cm (1”) to the right from your apex point.
 Step 2 | Draft two lines from that point towards the side seam following the dart (created by the FBA) underneath. Measure both legs of the dart and match them up by adding some extra width (if necessary) to the side seam. Repeat these steps for the other dart.
 Step 3 | Tape some paper behind the entire outer edge. Add seam allowance (green line), but don't cut it off yet. Close your dart and fold the dart allowance (at the back) down. While folded together, cut along your seam allowance line. Fold everything back open - the dart now has extra seam allowance needed for the dart to be pressed down after sewing. Repeat for the other side.
 Step 4 | Finally, collect your left & right back bodices. Assemble the back bodice by joining the diagonal seams. Tape in place. Add seam allowance to both vertical edges. If you need to add extra width to accommodate your hips, you can add it at this point. Consider that this might not be necessary when you're making the cropped version. You now have a separate front and back bodice and you're ready to sew your Shift tee! But do scroll down for some final notes and things to consider.
 Step 1 | On the right side of your front bodice, follow steps 1-4 from version 1.
 Step 2 | On the left side of your front bodice, follow steps 1-3 from version 2.
 Step 3 | Assemble the side front bodice with the back bodice. Add seam allowance to the diagonal side seams of both front bodice sides. Add seam allowance to the vertical edge of the side back bodice. You now have a front, back and side back bodice and you're ready to sew your Shift tee!
FINAL NOTES
The hard part is over! You've adjusted your pattern and you're ready to get on with the fun part - sewing! But here are some final things to consider:
* All versions - make sure to use the sleeve pattern pieces and neckband in the size matching your high bust measurement!
* Version 1 - Remember, there won't be a notch on the sleeve pattern pieces matching your new front bodice side seam.
* Version 1 - Also, if you've changed the placement of your diagonal seam, the notches on the sleeve pattern pieces matching the original diagonal seam, won't line up!
* Make a muslin. Yes.
If you have any further questions, leave me a comment below, ask your questions in our facebook group or shoot me an email at elles@misusu.co!
Comments will be approved before showing up.
Subscribe to our newsletter and always be the first to hear about what is happening.
© 2024 Misusu Patterns.
|
Body measurements cm |
Body measurements inch |
||||||||
|
Size |
Age |
Chest |
Waist |
Hip |
Height |
Chest |
Waist |
Hip |
Height |
|
80 |
9-12M |
50 |
48 |
52 |
80 |
19,5 |
19 |
20,5 |
31,5 |
|
86 |
12-18M |
52 |
50 |
54 |
86 |
20,5 |
19,5 |
21,25 |
33,75 |
|
92 |
18-24M |
54 |
51 |
55 |
92 |
21,25 |
20 |
21,5 |
36,25 |
|
98 |
2-3Y |
55 |
52 |
57 |
98 |
21,75 |
20,5 |
22,5 |
38,5 |
|
104 |
3-4Y |
56,5 |
53,5 |
59 |
104 |
22,25 |
21 |
23,25 |
41 |
|
110 |
4-5Y |
58 |
55 |
61 |
110 |
22,75 |
21,5 |
24 |
43,25 |
|
116 |
5-6Y |
60 |
57 |
64 |
116 |
23,5 |
22,5 |
25,25 |
45,5 |
|
122 |
6-7Y |
62,5 |
58,5 |
67 |
122 |
24,5 |
23 |
26,5 |
48 |
|
128 |
7-8Y |
65 |
60 |
70 |
128 |
25,5 |
23,5 |
27,5 |
50,5 |
|
134 |
8-9Y |
67,5 |
61,5 |
73 |
134 |
26,5 |
24,25 |
28,75 |
52,75 |
|
140 |
9-10Y |
70 |
63 |
76 |
140 |
27,5 |
24,75 |
30 |
55 |
|
146 |
10-11Y |
73 |
64 |
79 |
146 |
28,75 |
25,25 |
31 |
57,5 |
|
152 |
11-12Y |
76 |
66 |
82 |
152 |
30 |
26 |
32,25 |
59,75 |
|
158 |
12-13Y |
79 |
68 |
85 |
158 |
31 |
26,75 |
33,5 |
62,25 |
|
164 |
13-14Y |
82 |
70 |
88 |
164 |
32,25 |
27,5 |
34,75 |
64,5 |
|
Body measurements cm |
Body measurements inch |
|||||||||
|
Size |
High Bust |
Bust |
Waist |
Hip |
Height |
High Bust |
Bust |
Waist |
Hip |
Height |
|
AA |
77 |
82 |
66 |
88 |
168 |
20,25 |
32,25 |
26 |
34,75 |
5 feet 6" |
|
BB |
81 |
86 |
70 |
92 |
168 |
31,75 |
33,75 |
27,5 |
36,25 |
5 feet 6" |
|
CC |
85 |
90 |
74 |
96 |
168 |
33,5 |
35,5 |
29,25 |
37,75 |
5 feet 6" |
|
DD |
89 |
94 |
78 |
100 |
168 |
35 |
37 |
30,75 |
39,25 |
5 feet 6" |
|
EE |
93 |
98 |
82 |
104 |
168 |
36,5 |
38,5 |
32,25 |
41 |
5 feet 6" |
|
FF |
97 |
102 |
86 |
108 |
168 |
38,25 |
40,25 |
33,75 |
42,5 |
5 feet 6" |
|
GG |
103 |
108 |
92,5 |
114 |
168 |
40,5 |
42,5 |
36,5 |
44,75 |
5 feet 6" |
|
HH |
109 |
114 |
99 |
120 |
168 |
43 |
44,75 |
39 |
47,25 |
5 feet 6" |
|
II |
115 |
120 |
105,5 |
126 |
168 |
45,25 |
47,25 |
41,5 |
49,5 |
5 feet 6" |
|
JJ |
121 |
126 |
112 |
132 |
168 |
47,75 |
49,5 |
44 |
52 |
5 feet 6" |
| KK | 127 | 132 | 118,5 | 138 | 168 | 50 | 52 | 46,75 | 54,25 | 5 feet 6" |
| LL | 133 | 138 | 125 | 144 | 168 | 52,25 | 54,25 | 49,25 | 56,75 | 5 feet 6" |
| MM | 139 | 144 | 131,5 | 150 | 168 | 54,75 | 56,75 | 51,75 | 59 | 5 feet 6" |
| NN | 145 | 150 | 138 | 156 | 168 | 57 | 59 | 54,25 | 61,5 | 5 feet 6" |